
Placeholder Format
This guide uses <tenant> for your RocketDocs tenant name.
Replace <tenant> in each URL with your tenant name.
| Tenant URL | https://<tenant>.rocketdocs.com |
| ACS URL | https://<tenant>.rocketdocs.com/api/auth/AssertionConsumerService |
| RocketDocs login URL | https://<tenant>.rocketdocs.com/app/login |
| SCIM Endpoint URL | https://<tenant>.rocketdocs.com/integrationapi/scim |
Signing Model
-
Microsoft Entra ID signs the SAML assertion with its identity provider certificate.
-
RocketDocs uses the Entra certificate to authenticate the assertion.
-
The SAML response remains unsigned.
-
RocketDocs uses SCIM for optional user provisioning.
-
This setup does not use SAML Single Logout.
Step 1: Prepare The Values
Required Access
-
Use a Cloud Application Administrator or Application Administrator account.
-
Use a RocketDocs system administrator account.
-
For SCIM, use a subscription that includes application provisioning.
-
Keep one RocketDocs local administrator session open during SSO setup.
Create the RocketDocs Values
-
Record your RocketDocs tenant URL.
-
Build the ACS URL from the tenant URL.
-
Record the current SSO SP Name.
-
If no SSO SP Name exists, use the tenant URL.
-
Copy the SSO SP Name exactly into
-
Identifier (Entity ID)
| Tenant URL | https://<tenant>.rocketdocs.com |
| ACS URL | https://<tenant>.rocketdocs.com/api/auth/AssertionConsumerService |
| SSO SP NAME | Use the existing value. Otherwise, use the full tenant URL. |
| Identifier (Entity ID) | Use the exact SSO SP Name, including case, scheme, and trailing slash. |
| NameID | Use the email address that matches the RocketDocs SSO User ID. |
📋Note:
Keep Allow Users To Use System Login on during setup and testing. This setting helps prevent anadministrator lockout.
Choose How RocketDocs Creates Users
| Existing users | Keep Auto Generate SSO User off. |
| SCIM provisioning | Keep Auto Generate SSO User off. Complete Steps 13 through 17. |
| JIT provisioning | If your organization approves JIT, turn on Auto Generate SSO User. |
Step 2: Create the Entra enterprise application
-
Sign in to the Microsoft Entra admin center.
-
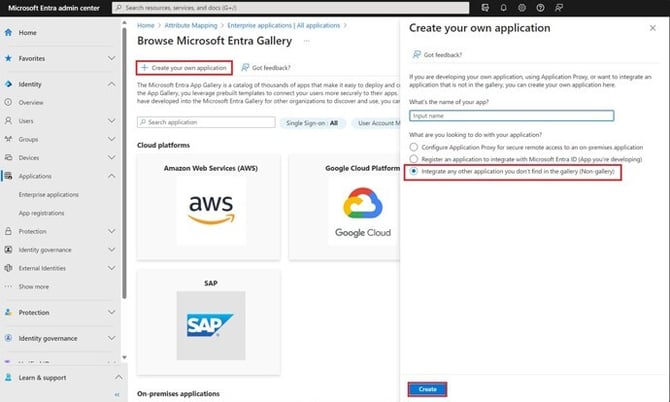
Go to Entra ID > Enterprise apps > All applications
-
Select New application
-
Select Create your own application
-
Enter RocketDocs - <company name> as the application name.
-
Select Integrate any other application you do not find in the gallery
-
Select Create
-
Wait for the application overview page to open.
📋Note:
Use this application for SAML SSO and SCIM provisioning.
Step 3: Enter the SAML endpoints
- Open the RocketDocs enterprise application.
- Select Single sign-on.
- Select SAML.
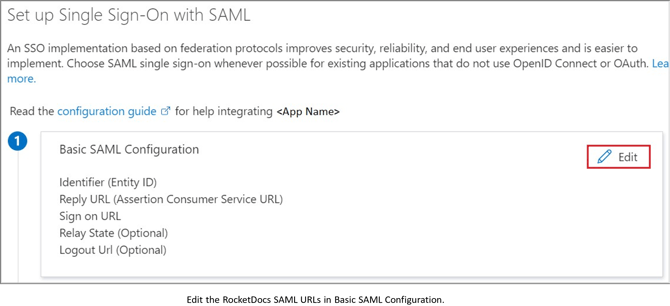
- Select Edit in Basic SAML Configuration.
- Enter the values in the following table.
- Select Save.
|
Entra field |
Value |
|
Identifier (Entity ID) |
Use the exact RocketDocs SSO SP Name. |
|
Reply URL (Assertion Consumer Service URL) |
https://<tenant>.rocketdocs.com/api/auth/AssertionConsumerService |
|
Sign on URL |
https://<tenant>.rocketdocs.com/app/login |
|
Relay State (Optional) |
Leave blank. |
|
Logout URL (Optional) |
Leave blank. |
📋Note:
The Entra Identifier (Entity ID) and RocketDocs SSO SP Name must match exactly. The Reply URL is a separate value.
Step 4: Configure the SAML NameID
- Find Attributes & Claims on the SAML setup page.
- Select Edit.
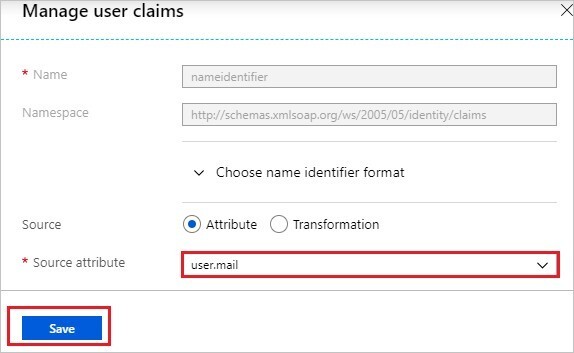
- Select Unique User Identifier (Name ID).
- Open Choose name identifier format.
- Select Email address.
- Select Attribute under Source.
- Select user.mail under Source attribute.
- Select Save.
📋Notes:
- Make sure that user.mail contains the exact RocketDocs SSO User ID for every assigned user. Make sure that each value is unique.
- Only when user.userprincipalname contains the exact SSO User ID, use it for NameID and both SCIM source mappings.
Step 5: Configure optional JIT claims
For existing or SCIM-provisioned users
- Keep the NameID mapping from Step 4.
- Do not add the JIT claims in this step.
- Make sure that the NameID matches the RocketDocs SSO User ID.
Only when RocketDocs JIT provisioning is on
Add these claims in the Entra Attributes & Claims page.
|
SAML claim name |
Entra source attribute |
|
|
user.mail |
|
firstname |
user.givenname |
|
lastname |
user.surname |
- Select Add new claim.
- Enter the claim name.
- Leave Namespace blank.
- Select Attribute under Source.
- Select the matching source attribute.
- Select Save.
- Repeat these steps for each claim.
📋Notes:
-
RocketDocs does not require a group or role claim for sign-in.
- JIT requires all three claims. When SCIM creates the users, keep JIT off.
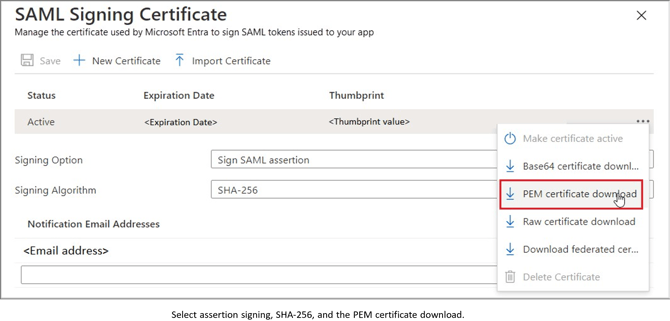
Step 6: Configure assertion signing
- Find SAML Certificates on the SAML setup page.
- Select Edit.
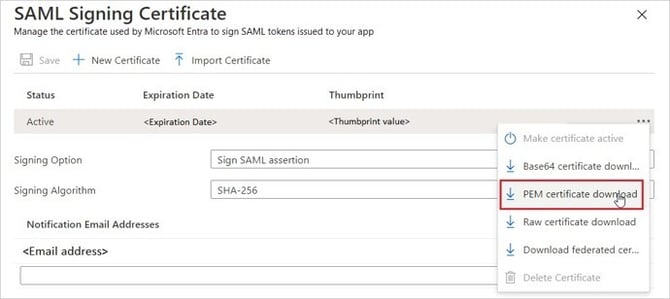
- Select the active certificate.
- Set Signing Option to Sign SAML assertion.
- Set Signing Algorithm to SHA-256.
- Add a certificate notification email address.
- Select Save.
- Open the active certificate menu.
- Select PEM certificate download.
- Save the Certificate file securely.
📋Notes:
- Make sure that user.mail contains the exact RocketDocs SSO User ID for every assigned user. Make sure that each value is unique.
- Only when user.userprincipalname contains the exact SSO User ID, use it for NameID and both SCIM source mappings.
Step 5: Configure optional JIT claims
For existing or SCIM-provisioned users
-
Keep the NameID mapping from Step 4.
-
Do not add the JIT claims in this step.
-
Make sure that the NameID matches the RocketDocs SSO User ID.
Only when RocketDocs JIT provisioning is on
Add these claims in the Entra Attributes & Claims page.
|
SAML claim name |
Entra source attribute |
|
|
user.mail |
|
firstname |
user.givenname |
|
lastname |
user.surname |
- Select Add new claim.
- Enter the claim name.
- Leave Namespace blank.
- Select Attribute under Source.
- Select the matching source attribute.
- Select Save.
- Repeat these steps for each claim.
📋Notes:
- RocketDocs does not require a group or role claim for sign-in.
- JIT requires all three claims. When SCIM creates the users, keep JIT off.
Step 6: Configure assertion signing
- Find SAML Certificates on the SAML setup page.
- Select Edit.
- Select the active certificate.
- Set Signing Option to Sign SAML assertion.
- Set Signing Algorithm to SHA-256.
- Add a certificate notification email address.
- Select Save.
- Open the active certificate menu.
- Select PEM certificate download.
|
RocketDocs setting |
Value |
|
Want Assertion Signed |
true |
|
Want Response Signed |
false |
Step 7: Assign pilot access
Require an assignment
- Select Properties in the enterprise application.
- Set Enabled for users to sign-in? to Yes.
- Set Assignment required? to Yes.
- Select Save.
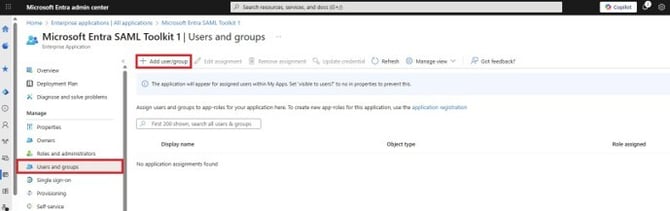
Assign one pilot user
- Select Users and groups.
- Select Add user/group.
- Select None Selected under Users and groups.
- Select one approved pilot user.
- Select Select.
- Select the default access role.
- Select Assign
📋Note:
Group-based assignment requires an Entra ID P1 or P2 license. Nested group membership does not assign access.
Step 8: Get the Entra identity provider values
- Return to the enterprise application Single sign-on page.
- Find Set up RocketDocs.
- Copy the displayed Login URL.
- Copy the displayed Microsoft Entra Identifier.
- Keep the PEM certificate file from Step 6.
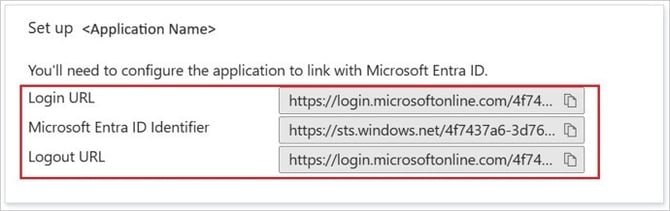
|
Entra value |
RocketDocs setting |
|
Microsoft Entra Identifier |
SSO Idp Name |
|
Login URL |
SSO Idp SingleSignOnServiceUrl |
|
PEM certificate |
SSO Idp PartnerCertificates |
|
Identifier (Entity ID) |
SSO SP Name |
📋Note:
Copy the displayed Microsoft Entra Identifier. Do not build this value manually.
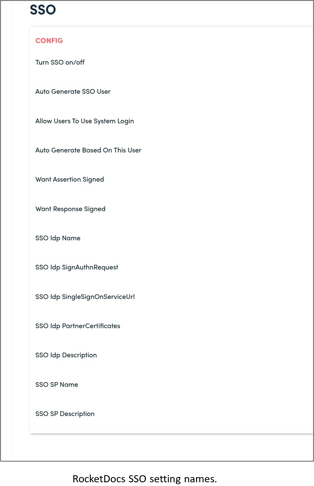
Step 9: Open the RocketDocs SSO settings
- Sign in to RocketDocs as an administrator.
- Open Settings.
- Select System Settings.
- Find the SSO section.
- Select the pencil icon to edit a setting.
📋Note:
- Enter the values from your Entra application in the matching RocketDocs fields.
-
If you cannot see System Settings, ask a RocketDocs administrator for access.
Step 10: Enter the RocketDocs SSO values
|
RocketDocs setting |
Value |
|
Turn SSO on/off |
Keep off during setup. After you save all values, set on. |
|
Auto Generate SSO User |
Set off for existing users or SCIM. Set on only for approved JIT provisioning. |
|
Allow Users To Use System Login |
Set on during setup and testing. |
|
Auto Generate Based On This User |
If JIT is off, leave blank. For JIT, select an active template user. |
|
Want Assertion Signed |
true |
|
Want Response Signed |
false |
|
SSO Idp Name |
Paste the Entra Microsoft Entra Identifier. |
|
SSO Idp SignAuthnRequest |
false |
|
SSO Idp SingleSignOnServiceUrl |
Paste the Entra Login URL. |
|
SSO Idp PartnerCertificates |
Paste the complete Entra PEM certificate text. |
|
SSO Idp Description |
Optional. Enter Microsoft Entra ID or another useful description. |
|
SSO SP Name |
Enter the exact Entra Identifier (Entity ID). |
|
SSO SP Description |
Optional. Enter a useful RocketDocs description. |
📋Note:
The Entra Identifier (Entity ID) and RocketDocs SSO SP Name must contain the same string.
- The letter case matches.
- The https:// scheme matches.
- The domain name matches.
- The trailing slash matches.
Step 11: Paste the Entra certificate
- Find the PEM certificate file that you downloaded from Entra.
- Open the file in a plain-text editor.
- Select the complete certificate text.
- Copy the text without changing it.
- Edit SSO Idp PartnerCertificates in RocketDocs.
- Paste the complete certificate text.
- Save the setting.
The copied text must include both boundary lines and all text between them.
|
-----BEGIN CERTIFICATE----- MIIC...all certificate characters and lines... -----END CERTIFICATE----- |
Make sure that RocketDocs saved the certificate
- Return to the RocketDocs SSO settings.
- Find SSO Idp PartnerCertificates.
- Make sure that RocketDocs reports Certificate present: True.
Step 12: Activate and test SSO
Activate SSO
- Make sure that all RocketDocs SSO values match Step 10.
- Keep Allow Users To Use System Login on.
- Set Turn SSO on/off to on.
- Keep the current RocketDocs administrator session open.
- Open a private browser window.
- Open https://<tenant>.rocketdocs.com/app/login.
- Sign in with the approved Entra pilot user.
- Make sure that the correct RocketDocs user opens.
Run an Entra test
- Open the enterprise application Single sign-on page.
- Find Test single sign-on with RocketDocs.
- Select Test.
- Sign in with the approved pilot user.
- Make sure that the correct RocketDocs user opens.
If the test fails
|
Entra denies access |
Make sure that the pilot user has an application assignment. |
|
Audience error |
Compare the Entra Identifier (Entity ID) with the RocketDocs SSO SP Name. |
|
Reply URL error |
Compare the Entra Reply URL with the RocketDocs ACS URL. |
|
User not found |
Compare the SAML NameID with the RocketDocs SSO User ID. |
|
Signature error |
Paste the complete active Entra PEM certificate again. |
After the pilot test succeeds, expand access.
Step 13: Generate the RocketDocs SCIM credentials
If your organization does not use SCIM provisioning, skip Steps 13 through 17.
📋Note:
These steps configure user provisioning only. Keep group provisioning off.
Make sure that SCIM is available
- Sign in to RocketDocs as a system administrator.
- Open Settings.
- Select System Settings.
- Find the SSO section.
- Make sure that SCIM Provisioning appears beside SSO.
📋Note:
If SCIM Provisioning does not appear, contact RocketDocs Support.
Generate the credentials
📋Note:
A new token immediately invalidates the current SCIM token. When you are ready to update Entra, generate a token.
- Select SCIM Provisioning.
- Select Generate token.
- Copy the SCIM Endpoint URL.
- Before you close the drawer, copy the Bearer Token.
- Record the displayed expiration date.
|
SCIM Endpoint URL |
https://<tenant>.rocketdocs.com/integrationapi/scim |
|
Bearer Token |
Use the token that RocketDocs shows after generation. |
📋Note:
Store the bearer token in your approved secret store. After you close the drawer, RocketDocs does not show the token again.
Step 14: Connect Entra to the SCIM endpoint
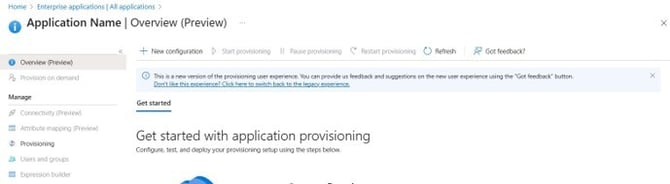
- Open the RocketDocs enterprise application in Entra.
- Select Provisioning.
- Select New Configuration
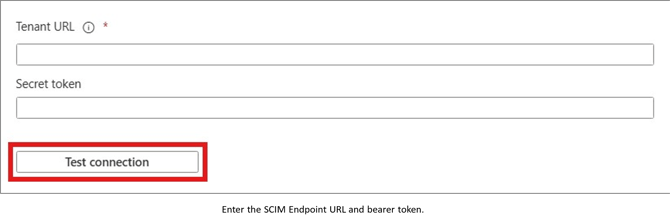
- Paste the RocketDocs SCIM Endpoint URL in Tenant URL.
- Paste the RocketDocs bearer token in Secret token.
- Do not add the word Bearer before the token.
- Select Test connection.
- Make sure that Entra reports a successful connection.
- Select Create.
📋Note:
If the test fails, compare the endpoint and token with the current RocketDocs values.
Step 15: Configure the SCIM user mappings
- Open Attribute mapping in the provisioning configuration.
- Open the user mapping.
- Set the user mapping to Enabled.
- Select Create and Update under Target Object Actions.
- Clear Delete.
- Enter the mappings in the following table.
|
Entra source |
SCIM target |
Settings |
|
|
userName |
Direct. Matching on. Precedence 1. Apply always. |
|
Not([IsSoftDeleted]) |
active |
Expression. Matching off. Apply always. |
|
givenName |
name.givenName |
Direct. Matching off. Apply always. |
|
surname |
name.familyName |
Direct. Matching off. Apply always. |
|
|
emails[type eq "work"].value |
Direct. Matching off. Apply always. |
- Remove the default mapping from objectId to externalId.
- Save the user mapping.
- Return to Attribute mapping.
- Open the group mapping.
- Set the group mapping to Disabled.
- Save the group mapping.
📋Note:
Use the same email for SAML NameID, SCIM userName, and RocketDocs SSO User ID. Before provisioning, make sure that mail, givenName, and surname contain values for every assigned user.
Step 16: Set the scope and test provisioning Configure the provisioning properties
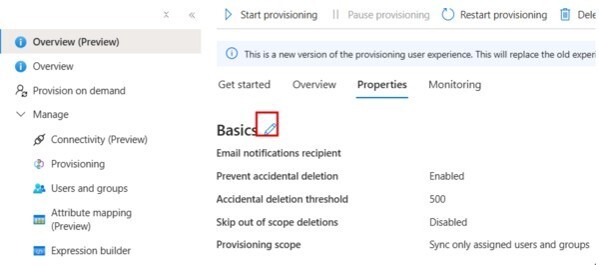
- Open Properties in the provisioning configuration.
- Add an email address for provisioning notifications.
- Set Prevent accidental deletion to Enabled.
- Set Skip out of scope deletions to Disabled.
- Set Provisioning scope to Sync only assigned users and groups.
- Select Save.
Provision one pilot user
- Select Provision on demand.
- Select the assigned pilot user.
- Select Provision.
- Make sure that Entra reports a successful provisioning event.
- Open RocketDocs User Management.
- Find the pilot user.
- Make sure that the name, email, and SSO User ID match Entra.
- Assign the required RocketDocs access, including a license.
- Test SSO with the pilot user.
📋Note:
A new SCIM user has the user role without a license, privileges, restrictions, or group memberships.
Step 17: Start and maintain SCIM Start provisioning
- Return to the provisioning overview.
- Select Start provisioning.
- Open Provisioning logs.
- Make sure that the next cycle succeeds.
Replace a SCIM token
Before the displayed expiration date, replace the SCIM token.
- Plan a short provisioning interruption.
- Open System Settings > SSO > SCIM Provisioning.
- Select Regenerate token.
- Copy the new bearer token.
- Replace the Entra Secret token immediately.
- Run Test connection again.
When your organization stops SCIM provisioning, select Revoke token.
Test profile changes
After an approved profile change, use Provision on demand and make sure that RocketDocs receives the value.
If SCIM fails
|
Connection test fails |
Compare the SCIM Endpoint URL and the current bearer token. |
|
Entra reports unauthorized |
Replace a lost, expired, revoked, or regenerated token. |
|
User already exists |
Match Entra mail and SCIM userName to the RocketDocs SSO User ID. |
|
User cannot sign in |
Compare the SAML NameID, Entra assignment, and RocketDocs SSO User ID. |
|
User has no access |
Assign a RocketDocs license and any required groups or privileges. |
Get support
If you need help, email support@rocketdocs.com.
Include the tenant URL, Entra application name, error message, and test time.
Do not send a bearer token, certificate file, or user password.
Related help: Enable SAML SSO, configure SAML signing, and assign application access. Also see Configure a SCIM endpoint, configure attribute mappings, and provision a user on demand. Microsoft Entra interface labels can change.