
Placeholder Format
This guide uses <tenant> for your RocketDocs tenant name.
For example, replace <tenant> in each URL with your tenant name.
|
Tenant URL |
https://<tenant>.rocketdocs.com |
|
ACS URL |
https://<tenant>.rocketdocs.com/api/auth/AssertionConsumerService |
|
Login URL |
https://<tenant>.rocketdocs.com/app/login |
|
SCIM Endpoint URL |
https://<tenant>.rocketdocs.com/integrationapi/scim |
Signing model
-
Okta signs the SAML assertion with the Okta IdP certificate.
-
RocketDocs uses the Okta IdP certificate to verify the assertion.
-
RocketDocs uses SAML for sign-in.
-
RocketDocs uses SCIM for optional user and group provisioning.
-
This setup does not use SAML Single Logout.
Step 1: Prepare the values
Required access
-
Use an Okta account that can create and assign applications.
-
Use a RocketDocs account that can edit System Settings.
-
Keep one RocketDocs local administrator session open during SSO setup.
Create the RocketDocs values
- Record your RocketDocs tenant URL.
- Build the ACS URL from the tenant URL.
- Choose a stable SSO SP Name.
- Use the same SSO SP Name as the Okta Audience URI.
|
Tenant URL |
https://<tenant>.rocketdocs.com |
|
ACS URL |
https://<tenant>.rocketdocs.com/api/auth/AssertionConsumerService |
|
SSO SP Name |
Use the existing value when one exists. Otherwise, use the full tenant URL. |
|
Okta Audience URI |
Use the exact SSO SP Name. |
|
NameID |
Use the email address that matches the RocketDocs SSO User ID. |
📋Note:
Keep Allow Users To Use System Login on during setup and testing. This setting helps prevent an administrator lockout.
Choose how RocketDocs creates users
|
Existing users |
Keep Auto Generate SSO User off. |
|
SCIM provisioning |
Keep Auto Generate SSO User off. Complete Steps 13 through 17. |
|
JIT provisioning |
Turn on Auto Generate SSO User only when your organization approves JIT. |
Step 2: Create the Okta app integration
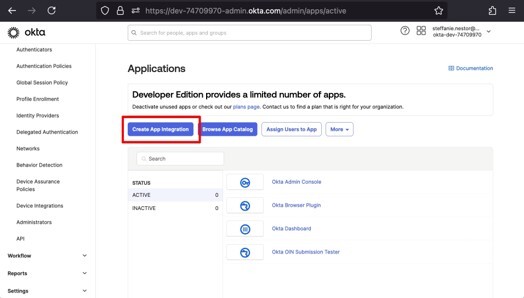
- Sign in to the Okta Admin Console.
- Go to Applications > Applications.
- Select create app integration.
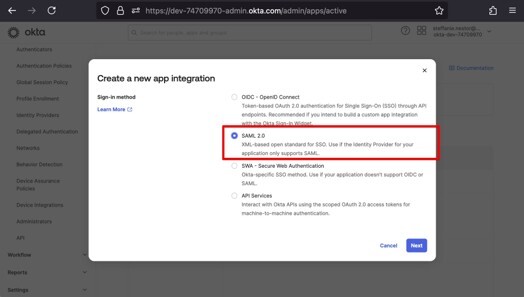
- Select SAML 2.0.
- Select next.
Step 3: Name the application
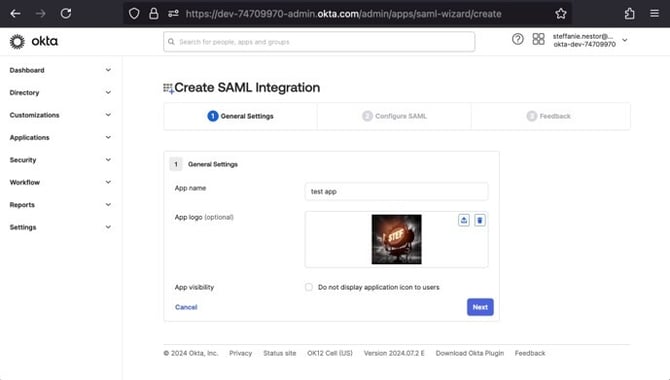
- Enter RocketDocs - <company name> in App name.
- Upload the RocketDocs logo if required.
- Keep the application visible unless your policy requires a hidden tile.
- Select Next.
📋Note:
The application name controls the label that administrators and assigned users see in Okta.
Step 4: Configure the Okta SAML settings
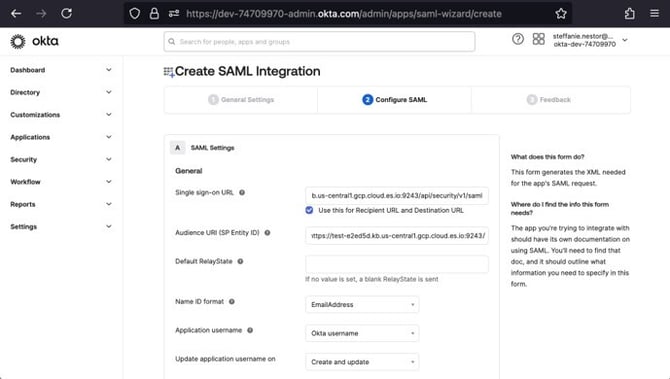
- Enter the RocketDocs ACS URL in Single sign-on URL.
- Select Use this for Recipient URL and Destination URL.
- Enter the RocketDocs SSO SP Name in Audience URI.
- Leave Default RelayState blank.
- Select EmailAddress for Name ID format.
- Select Email for Application username.
- Select Create and update for username updates.
|
Single sign-on URL |
https://<tenant>.rocketdocs.com/api/auth/AssertionConsumerService |
|
Audience URI |
Use the exact RocketDocs SSO SP Name. |
Step 5: Configure Okta signing
- Select Show Advanced Settings.
- Set Response to Unsigned.
- Set Assertion Signature to Signed.
- Set Signature Algorithm to RSA-SHA256.
- Set Digest Algorithm to SHA256.
- Set Assertion Encryption to Unencrypted.
- Clear Enable Single Logout.
- Clear Signed Requests.
- Do not add another requestable SSO URL.
- Keep Assertion Inline Hookset to None.
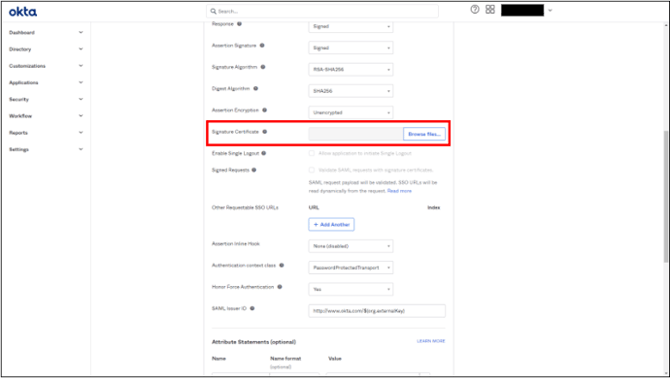
Okta still signs the assertion with the Okta IdP certificate.
Step 6: Configure attributes and finish
For existing or SCIM-provisioned users
- Do not add an attribute statement.
- Make sure the NameID is the user's email address.
- Make sure the NameID matches the RocketDocs SSO User ID.
Only when RocketDocs JIT provisioning is on
|
Attribute name |
Okta value |
|
|
user.email |
|
firstname |
user.firstName |
|
lastname |
user.lastName |
📋Note:
RocketDocs does not require a group or role claim for sign-in.
Finish the wizard
- Select Next.
- Select I am an Okta customer adding an internal app.
- Select This is an internal app that we have created.
- Select Finish.
📋Note:
Do not enable Single Logout after the wizard finishes.
Step 7: Assign Okta users or groups
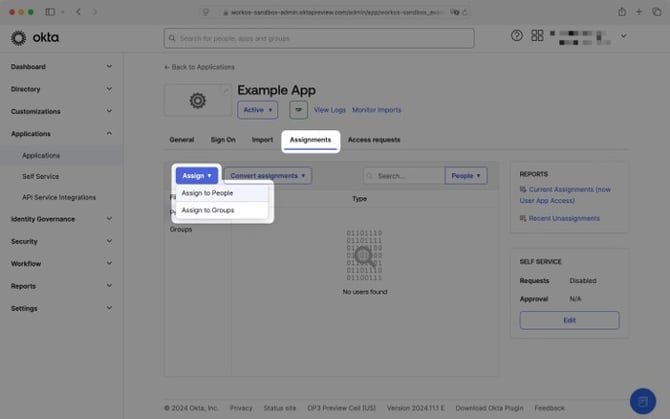
- Open the new RocketDocs application.
- Select the Assignments tab.
- Select Assign.
- Select Assign to Groups or Assign to People.
- Assign one test user or an approved group.
- Select Done.
📋Note:
Do not assign Everyone unless your organization approves access for all users.
Start with one test user when your change policy permits it.
Step 8: Get the Okta IdP values
- Select the Sign On tab.
- Find the Metadata details section.
- Copy the Metadata URL for your records.
- Select More details.
- Copy the Sign on URL.
- Copy the Issuer.
- Download the Signing Certificate.
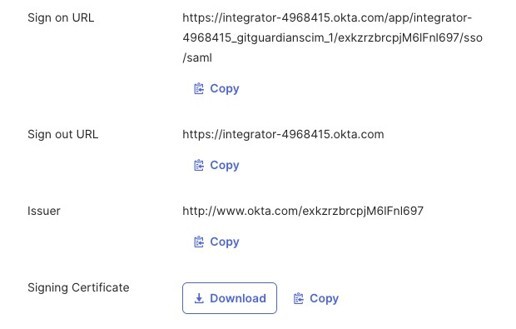
Keep these Okta values
-
Metadata URL
-
Sign on URL
-
Issuer
-
Okta IdP signing certificate
📋Note:
The downloaded certificate is the Okta IdP certificate. It is safe to provide this public certificate to RocketDocs. Do not provide an Okta private key.
Step 9: Open the RocketDocs SSO settings
- Sign in to RocketDocs as an administrator.
- Open Settings.
- Select System Settings.
- Find the SSO section.
- Select the pencil icon to edit a setting.
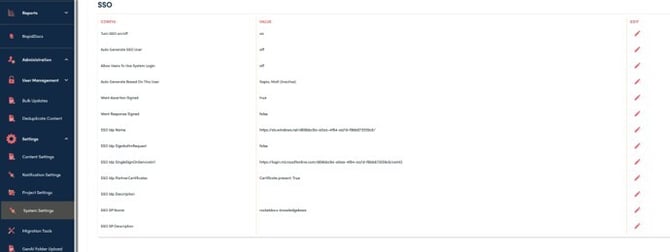
📋Note:
Do not copy the example values from the screenshot. Use the Okta values from your own application.
If you cannot see System Settings, ask a RocketDocs administrator for access.
Step 10: Enter the RocketDocs SSO values
|
RocketDocs setting |
Value |
|
Turn SSO on/off |
Keep off during setup. Set on after all values are saved. |
|
Auto Generate SSO User |
Set off for existing users or SCIM. Set on only for approved JIT provisioning. |
|
Allow Users To Use System Login |
Set on during setup and testing. |
|
Auto Generate Based On This User |
Leave blank unless JIT is on. For JIT, select an active template user. |
|
Want Assertion Signed |
true |
|
Want Response Signed |
false |
|
SSO Idp Name |
Paste the Okta Issuer. |
|
SSO Idp SignAuthnRequest |
false |
|
SSO Idp SingleSignOnServiceUrl |
Paste the Okta Sign on URL. |
|
SSO Idp PartnerCertificates |
Paste the complete Okta IdP certificate text. |
|
SSO Idp Description |
Optional. Enter Okta or another useful description. |
|
SSO SP Name |
Enter the exact Okta Audience URI. |
|
SSO SP Description |
Optional. Enter a useful RocketDocs description. |
Step 11: Copy and paste the Okta certificate
- Find the certificate file that you downloaded from Okta.
- Open the file in a plain-text editor.
- Use Notepad, TextEdit in plain-text mode, VS Code, or a similar editor.
- Select the complete certificate text.
- Copy the text without changing it.
- Edit SSO Idp PartnerCertificates in RocketDocs.
- Paste the complete certificate text.
- Save the setting.
The copied text must include both boundary lines and all text between them.
-----BEGIN CERTIFICATE-----
MIIC...all certificate characters and lines...
-----END CERTIFICATE-----
📋Note:
Copy the entire string. Include BEGIN CERTIFICATE and END CERTIFICATE. Do not remove characters, spaces, or line breaks.
If the certificate file is not readable text
- Return to the Okta application Sign On tab.
- Open View SAML setup instructions.
- Find the X.509 certificate.
- Copy the complete certificate text from the page.
- Paste the text into SSO Idp PartnerCertificates.
After you save, RocketDocs shows Certificate present: True.
Step 12: Activate and test SSO Activate SSO
- Check all RocketDocs SSO values.
- Keep Allow Users To Use System Login on for the first test.
- Set Turn SSO on/off to on.
- Keep the current RocketDocs administrator session open.
- Open a private browser window.
- Open https://<tenant>.rocketdocs.com/app/login.
- Sign in with the assigned Okta test user.
- Confirm that the correct RocketDocs user opens.
After a successful test
Assign the approved production users or groups in Okta.
Set Allow Users To Use System Login according to your access policy.
Keep an approved recovery method for administrator access.
If the test fails
|
Okta denies access |
Confirm that Okta assigns the user or group to the application. |
|
Audience error |
Compare the Okta Audience URI with the RocketDocs SSO SP Name. |
|
User not found |
Compare the SAML NameID with the RocketDocs SSO User ID. |
|
Signature error |
Paste the complete current Okta IdP certificate again. |
Step 13: Generate the RocketDocs SCIM credentials
Skip Steps 13 through 17 if your organization does not use SCIM provisioning.
Check access
- Sign in to RocketDocs as a system administrator.
- Open Settings.
- Select System Settings.
- Find the SSO section.
- Confirm that SCIM Provisioning appears beside SSO.
📋Note:
If SCIM Provisioning does not appear, contact RocketDocs Support.
Generate the credentials
📋Note:
A new token immediately invalidates the current SCIM token. Generate a token when you are ready to update Okta.
- Select SCIM Provisioning.
- Select Generate token.
- Copy the SCIM Endpoint URL.
- Copy the Bearer Token before you close the drawer.
- Record the displayed expiration dat
|
SCIM Endpoint URL |
https://<tenant>.rocketdocs.com/integrationapi/scim |
|
Bearer Token |
Use the token that RocketDocs shows after generation. |
📋Note:
Store the bearer token in your approved secret store. RocketDocs does not show the token again after you close the drawer.
Step 14: Configure the Okta SCIM connection Enable SCIM
- Open the RocketDocs application in the Okta Admin Console.
- Select the General tab.
- Find App Settings.
- Select Edit.
- Select SCIM in the Provisioning field.
- Select Save.
📋Note:
If SCIM does not appear in the Provisioning field, contact Okta Support.
Enter the connection values
- Select the Provisioning tab.
- Select Settings > Integration.
- Select Edit.
|
Okta setting |
Value |
|
SCIM connector base URL |
Paste the RocketDocs SCIM Endpoint URL. |
|
Unique identifier field for users |
userName |
|
Supported provisioning actions |
Select Push New Users and Push Profile Updates. |
|
Push Groups |
Select only when Okta will manage RocketDocs groups. |
|
Authentication Mode |
HTTP Header |
|
Authorization |
Paste the RocketDocs Bearer Token. |
- Select Test Connector Configuration.
- Confirm that the connection test succeeds.
- Select Save.
Step 15: Configure SCIM provisioning
Enable user provisioning
- Select Provisioning > Settings > To App.
- Select Edit.
- Enable Create Users.
- Enable Update User Attributes.
- Enable Deactivate Users.
- Select Save.
Check the user mappings
Use the same email address for the SAML NameID and the SCIM userName.
|
Okta value |
SCIM attribute |
RocketDocs value |
|
user.email |
userName |
SSO User ID |
|
user.firstName |
name.givenName |
First name |
|
user.lastName |
name.familyName |
Last name |
|
user.email |
emails (primary value) |
|
- Find the attribute mappings under To App.
- Compare the mappings with the table.
- Edit each mapping that differs.
Optional: Configure group push
Use group push only when Okta will manage the pushed RocketDocs groups.
📋Note:
Do not use the same Okta group for application assignment and group push.
- Select the Push Groups tab.
- Select Push Groups.
- Find an approved test group by name or rule.
- Push the approved test group.
📋Note:
If Okta deletes a pushed group, RocketDocs deletes that group and its managed memberships.
Step 16: Test SCIM provisioning
Provision one test user
📋Note:
A new SCIM user has the user role and no license, privileges, or group memberships by default. Assign a RocketDocs license and any required groups or privileges before sign-in.
- Open the RocketDocs application in Okta.
- Select the Assignments tab.
- Assign one approved test user who is not assigned to the application.
- Confirm that Okta reports a successful assignment.
- Open RocketDocs User Management.
- Find the test user.
- Confirm the first name, last name, email, and SSO User ID.
- Assign a RocketDocs license and any required groups or privileges.
- Sign in to RocketDocs as the test user through Okta.
Test an update
- Change an approved profile value for the test user in Okta.
- Wait for Okta to send the update.
- Confirm the new value in RocketDocs.
- Restore the approved profile value in Okta.
Test deactivation when required
- Unassign the RocketDocs application from the approved test user.
- Open RocketDocs User Management.
- Confirm that RocketDocs deactivates the test user.
- Confirm that the user cannot sign in to RocketDocs.
- Reassign the application if the test user still needs access.
After a successful test
Assign the approved production users in Okta.
Push approved groups only when Okta will manage those groups.
Keep Auto Generate SSO User off for SCIM-provisioned users.
Step 17: Maintain and troubleshoot SCIM
Replace a SCIM token
Replace the SCIM token before its displayed expiration date.
- Plan a short provisioning interruption.
- Open System Settings > SSO > SCIM Provisioning.
- If an active token exists, select Regenerate token.
- If no active token exists, select Generate token.
- Copy the new bearer token.
- Replace the Okta Authorization value immediately.
- Run Test Connector Configuration again.
Select Revoke token when your organization stops SCIM provisioning.
If SCIM fails
|
Connection test fails |
Check the SCIM Endpoint URL and the current bearer token. |
|
Okta reports unauthorized |
Replace a lost, expired, or revoked token. |
|
User already exists |
Match the Okta email and userName to the RocketDocs SSO User ID. |
|
User cannot sign in |
Check the SAML NameID, Okta assignment, and RocketDocs SSO User ID. |
|
User has no access |
Assign a RocketDocs license and any required groups or privileges. |
Get support
Email support@rocketdocs.com if you need help.
Include the tenant URL, Okta Issuer, error message, and test time.
Do not send a bearer token, private key, or user password.
References: Okta SAML app integration guide, Okta SAML field reference, Okta SCIM provisioning guide, Okta SCIM 2.0 reference, and Okta app assignments and Group Push. Okta interface labels can change.